

ramen recipe adapted from David Chang’s Momofuku cookbook

This is part 2 of my Momofuku ramen guide. This post focuses almost exclusively on the cooking process, the ingredients, and the time management aspect to making this ramen, an easy to execute but time intensive dish. While I strongly suggest you check out part 1 of the ramen guide for the grocery list and tips and tricks, this is where you’ll find the real how-to.
I’ve assembled this recipe in a way that will allow you to cook everything over a two-day period. I’ve also timed it from a perspective that encourages oven optimization. Keep that in mind, as items like the taré can actually be made a few days in advance (it lasts 3 to 4 in the fridge) or it can be made the day of so long as you start it about 3-hours before service time.
I have also included a time estimate with each component – which for me – starts as soon as you begin to use the ingredients for the first step. These time estimates are just a way of me telling you how long it took us to do everything, so resting time, clean up time, and time away from the food is included in that number. You can do this by yourself no doubt, but a second in command is a big help (as well as a lot more fun – Thanks Papa Buddha!). If you want to view all the videos (they’re really awesome AND totally amazing!), check out the YouTube playlist. Meanwhile, all of my slightly less bad pictures are on Flickr!
Cooking Your Momofuku Ramen
Use this in combination with the sections below to figure out what is involved in each step, what order you should do things, and when you should start each mini-project.
DAY 1:
Start no later than mid-afternoon.
- Knock out the first step for the pork belly & the pork shoulder
- Do the taré – once you’re done with it – drop your oven down to 400 degrees.
- Make your ramen broth.
- Prepare your broth for overnight storage. You can probably get away with just leaving it if you are serving it on day two; however, if you can also go ahead and condense it and bring it back to life tomorrow. Instructions on how to do that are at the end of the ramen broth section.
DAY 2:
- 8.5 hours until service: Get the pork belly into the oven so that you have time to cool before serving.
- 6.5 hours until service: After pulling out the belly, turn your oven up to 250, once it’s at temperature – put in the pork shoulder. You should be 6.5 hours from eating.
- 90 minutes until service: Start bringing your ramen broth back to life. Season it during this time until you get it to your liking. Mirin will help make it sweeter and taré will help give it a “thoughtful” taste. Get your pasta water started.
- 60 minutes until service: If you want to slow poach some eggs, now is the time to start. After you heat the water, cook time is around 40 minutes – so this should be enough time to make them just right. Alternatively, you can make them a day in advance when things are less hectic.
- 30 minutes until service: Pull your shoulder from the oven. If you haven’t already, prep your nori, fish cakes, bamboo shoots, and whatever else you want. We made our corn during this window.
- 10 minutes until service: Start to cook your pasta *adjust depending on your noodle choice* and heat your ramen bowls in the oven using a low low temperature.
- 5 Minutes until service: Pull the noodles and strain, then shred your pork, then heat your pork belly slices.
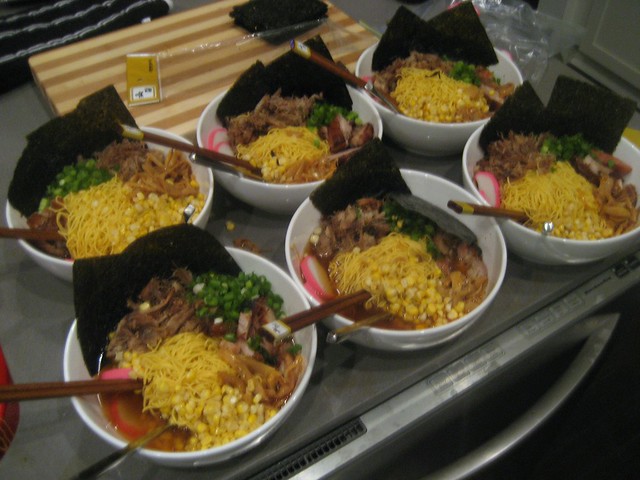
- SERVICE: Pull your bowls from the oven and fill them with a serving of noodles. Ladle with broth, then, using the outside area – start filling in with the fixings and meats. Last, use your large slices of seaweed. Put them sticking up a side of the bowl so that
Now get eating!
Momofuku Recipe Card
Taré
[youtube=http://www.youtube.com/watch?v=qXuCa_01OWk]
As I mentioned before, good ramen is about the broth and this recipe starts with taré – which is kind of a soy sauce version of barbecue sauce. This is some delicious Momofuking shit and I had a hard time not guzzling it before using it as intended. I actually used a bit more soy and a bit less mirin than this recipe calls for – but if you’re less adventurous – just stick to the letter of the law.
The Foodie Buddha time estimate: 2 hours start to finish
Difficulty: Super Easy
Makes 2 cups
Ingredients:
- 1 cup of sake
- 1 cup of mirin (a rice wine – sweet sherry would *probably* work here as well)
- 2 cups of light soy sauce
- 1 chicken
Putting it together:
- Butcher your chicken. Make sure to separate all the pieces as the key here is to get as much of the chicken exposed as possible.
- Put it in a 450 degree oven for roughly 45 minutes. I suggest a caste iron skillet. After about 40 minutes, watch this like a hawk. You’re looking for a nice brown – make sure you don’t burn it.
- When your chicken is nicely browned, move it to the stove and hit it with some heat (Chang suggests medium-high) and a touch of soy.
- Once this bubbles, scrap all that caramelized fond up and then add all your “juices.”
- Bring that up in temperature and once it boils – reduce it so it simmers and leave it on your stove for 1hr or so.
- Strain out the chicken and you’re ready to rock. It’ll keep in the fridge for a few days.
- Lastly, fight everyone tooth and nail for that chicken. It’s goooooood.
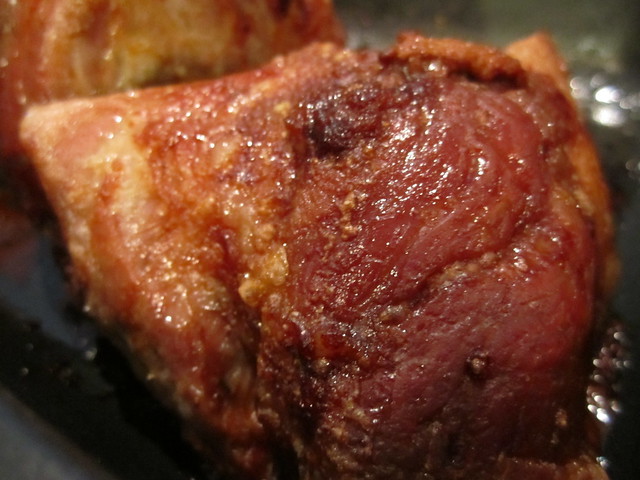
Momofuku Pork Belly
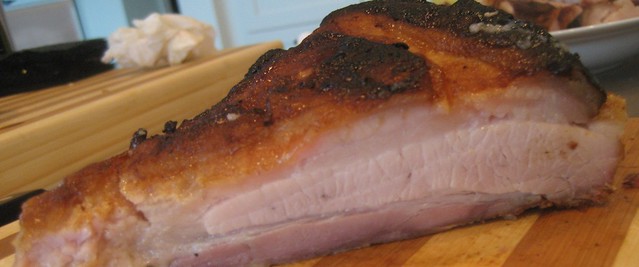
Pork belly is bacon, so if you don’t want to prepare your own – just buy some big old thick and hunky smoked bacon and you’ll be okay. It’s well worth making this yourself as it’s so easy, a caveman could do it. Ultimately, because you have to let it sit for a bit before actually cooking it, you need to start this on day 1 and get to it pretty early on day 2.
The Foodie Buddha time estimate: A night in the fridge + 8 hours
Difficulty: Super Easy (or just Easy if you are slicing the skin off your belly)
Makes: Roughly 6 to 8 servings
Ingredients
- 3 lbs of skinless pork belly
- 1/4 cup kosher salt
- 1/4 cup sugar
Cooking It
- Day 1: Put your belly into a refrigerator friendly apparatus and try and get one that fits it tightly. Mix your sugar and salt then rub it on your belly. Cover it with plastic wrap and let it sit overnight, but no more than 24-hours according to Chang. Ours was in at 1am and out at 10am.
- Day 2: Get rid of the liquid that’s in with your pork belly, then put the belly in a 450 degree oven. After 30-minutes, baste it (aka take the juice that’s collected and pour it over the belly itself). Cook for another 30 minutes, then drop the temperature to 215 degrees (we actually went 205) for approximately 60 more minutes.
- Put the belly on a plate (you can reserve the juices and stuff for a slew of other reasons, we accidentally discarded it!). It should look like this. Let it cool down a little and then toss it in the fridge to let it cool completely. You can skip this if need be, but I didn’t and I’d recommend you not either.
- Just before serving, slice it into cubes (whatever size you like really) and cook it in a pan over a medium heat on the stove just to warm it.
Momofuku Pork Shoulder
The Foodie Buddha time estimate: A night in the fridge + 7 hours
Difficulty: Super Easy
Makes: Roughly 6 to 8 servings
Ingredients
- 3 lbs. piece of boneless pork shoulder
- 1/4 cup kosher salt
- 1/4 cup sugar
Cooking It
- Day 1: Mix the salt & sugar, put the shoulder in an oven safe container that holds it snuggly, then cover it with the mixture. Cover it with plastic wrap and let it sit overnight, but no more than 24-hours according to Chang. Like our pork belly, our shoulder was in at 1am and out at noon.
- Day 2: Put the shoulder in a 250 degree oven for 6 hours. Every hour you need to baste it. Again, that’s just when you take the juices collecting at the bottom of the pan and pour them out again.
- Pull it out of the oven, let it sit for roughly 30-minutes (ours was ready to go after 25), then shred that sucker using two forks.
Note: If you aren’t doing this the day of, after shredding your shoulder, add some of the rendered fat (the stuff at the bottom of the pan), put it in a covered dish or Tupperware and then stick it in the fridge. You’ll have a few days.
Ramen Broth
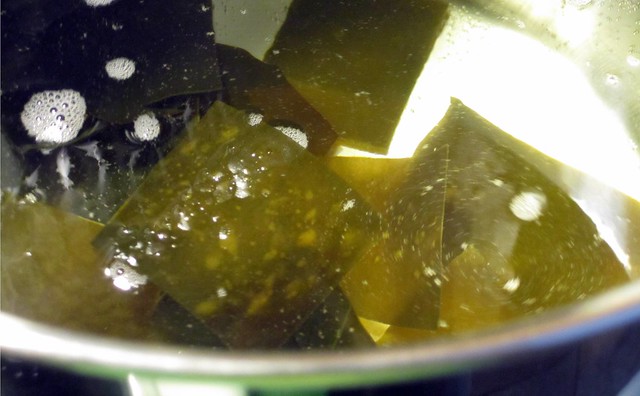
Ramen broth IS the ramen. You can’t have delicious ramen without it and so you should put most of attention and care into your broth. Chang explains that ramen broth is very useful and this stuff will freeze just fine – so you can make as much or as little as you want. His thinking is that making any less than this is a waste of time since most stock pots will hold at least this much. Less broth does not mean less work. I’ll leave you to figure out how much to make.
The Foodie Buddha time estimate: 9 to 10 hours
Difficulty: Super Easy
Makes: 5 quarts. If ramen is the meal, I’d generally say you should get 10 servings out of 5 quarts. (1q = 2 pints = 4 cups). If you are doing this with some other stuff, you can probably just do a cup/person.
Ingredients
-
3×6 inch pieces of kelp (aka konbu)
-
2 cups of dried shitakes
-
4 lbs. of chicken
-
5 lbs. of pork bones (try to get your butcher to give you some with a little meat on them – it’s for flavor)
-
1 lb. smoked bacon
-
1 bunch of scallions
-
1 medium onion
-
2 large carrots
-
Taré
Cooking It
-
Rinse the kelp and then put it in your stock pot along with 6 quarts of water. You want to simmer this, so you can safely just turn the heat on full blast and give it some time. Don’t let it boil though!!! Anyway, after it’s simmering (little bubbles) – cut the heat and let it chill. Chang says wait 10 minutes, we took 20. Go ahead and crank your oven to 400 degrees … you’ll thank me later.
-
Replace the konbu with your mushrooms by way of a slotted spoon (don’t want to take out the broth). Note replace (not add to). We used whole heads, but I think sliced dried shitakes would have done better. Blast the heat until you get a boil this time. Once it’s boiling – cut it the heat and let things sit for about 20 to 30 minutes. (Chang says 30).
-
(A) Put your pork bones on a baking sheet and toss them in your oven. 60-minutes on the cook, flipping 30-minutes in. (B) Pull the ‘shrooms and replace them with the chicken. For the next hour or so, check your broth every few minutes and do two things: skim the foam and stuff at the top and repeatedly add water when needed to keep the chicken fully submerged. Don’t forget to flip your pork bones. (C) While this is going on, clean and chop your carrots. Remove the outside layer of your onion and give it a good whack in half. Wash the scallions.
-
We let our chicken sit in for about 1.5 hours before we removed it. Chang says to check it after an hour. However long you take, you’re looking for the chicken fall off the bone without a fight. Make sure to get all the floating parts out too!
-
After you’ve cleaned the broth, add in your bacon and your pork bones. You are looking for a simmer so put enough heat on the pot to get those tiny bubbles back. If the water dips too low, just toss in some more. Yank the bacon about 45 minutes in (though we let it go closer to an hour).
-
Let that sit, checking in every so often to make sure the water level is sufficient. Don’t replenish it anymore once it’s been on the stove for 5 hours. We cooked planned on cooking our broth 8 hours, but you can probably get away with 6 or 10 or whatever. The point is that 45 minutes before you’re “done,” add in your onions, carrots, and scallions.
-
Once that’s done, strain your broth so those bones and veggies are out of the picture. Then, assuming you’re going to serve it shortly thereafter, start adding in the taré to help with the flavor. Your taré is the key here, so add in a good amount. I basically started with portioned of a cup and once that was done, I touched it with a little salt and even a bit more taré. You want something with really pronounced flavors. You don’t want a salt lick either, but … the idea is that your broth is going to get cut by all the other stuff that goes in. So you’re much better off going closer to the heavily seasoned end of the spectrum.
Note: If you’re not serving the broth that day, you can reduce it by half by putting it on the stove under high heat. Then put that in either the fridge or the freezer. Just make sure you do that before you add in the taré but after you’ve cleared out the veggies and stuff. To bring it back, just heat your concentrate in a 1:1 ratio with water.
Suggested Ramen Toppings
There are a slew of additional items that you can put in your ramen that will make it kick freaking butt. My only real suggestion is that you don’t use seeded veggies & fruits (no tomaters), and if you want to add something like corn – just make sure it’s in season. Buy it fresh! From a Farmers Market! Anyway, here are a few suggested toppings:
-
Corn off the cob – if it’s corn season
-
Fish cakes – you can find this in the freezer section of most any Asian grocery.
-
Nori – this is seaweed, easy to find.
-
Bamboo shoots – you’ll probably want to season these before using them …
-
Scallions – raw chopped onions seem like a must.
-
Poached eggs – however you want to make them – just make them. They are sooo freaking good in ramen.
Other Resources
FOR MY MOMOFUKU RAMEN VIDEOS, VISIT YOUTUBE
- Momofuku for 2’s ramen project (01/2010)
- NoodleFever’s Momofuku ramen project (01/2010)
- Food Nouveau’s Momofuku ramen project (02/2011)
3 comments Write a comment